Overview
- This tutorial shows how to start a basic app and implement Stripe customer portal. If you're integrating the customer portal into an existing app, you can skip to Customer portal integration.
- This tutorial assumes you have experience creating a basic rails app.
- Gems used: stripe, stripe_event, devise (optional).
Initial setup
First things first, let's start by creating a brand new Rails app. In your terminal, type in the following command:
> rails new stripe_customer_portal_tutorial
Voila! You've got a new Rails app (I still get a kick every time I do this bit 😛). Now, navigate to the root folder of your app in the terminal and create a fresh new database for the app by running this command:
> rails db:create
Now, it's time to test that your app is all set up and ready to go. To do that, start the Rails server with this command:
> rails s
Open your favorite browser and visit http://localhost:3000 to see your new app in action.
Installing devise and setting up users
To set up user authentication, please follow the instructions provided on the GitHub page: https://github.com/heartcombo/devise. In this tutorial, we will be adding Stripe details to the users table. However, in some cases, such as a multitenant application, you may want to base subscriptions on a per-company basis instead of per-user. In such instances, the Stripe details for subscriptions will be stored in the companies table.
Customer portal integration
Next you'll have to install the stripe gem by adding gem 'stripe' to your Gemfile and then run bundle.
Oh also, you need to create a Stripe account at https://stripe.com. Once you're in, navigate to https://dashboard.stripe.com/account/apikeys and grab your secret key (starts with 'sk_'). We'll keep this safe in your credentials file 🔐
Open your credentials file by running this command in your terminal. This will open the credentials file in nano editor. You can replace nano with your preferred editor.
> EDITOR="nano --wait" rails credentials:edit
Add the following to the credentials file:
# credentials.yml
stripe:
  secret_key: YOUR_SECRET_KEY
Next, let's create a stripe initializer file. Here's shortcut to doing that. You're welcome 😎
> touch config/initializers/stripe.rb
Add the following line to this file to initialize the Stripe API key:
# config/initializers/stripe.rb
Stripe.api_key = Rails.application.credentials.stripe[:secret_key]
Then add Stripe fields to your user model as below. The stripe_customer_id will hold the the unique customer id of the user on Stripe. The subscription_status column will hold information about whether the subscription is active, trialing or cancelled etc. The plan column will hold the name of the product they are currently subscribed to. Here are the commands you'll need.
Note: We're making the plan column an integer type, because we'll be using it as an enum later on.
> rails g migration add_stripe_fields_to_users stripe_customer_id:string subscription_status:string plan:integer
> rails db:migrate
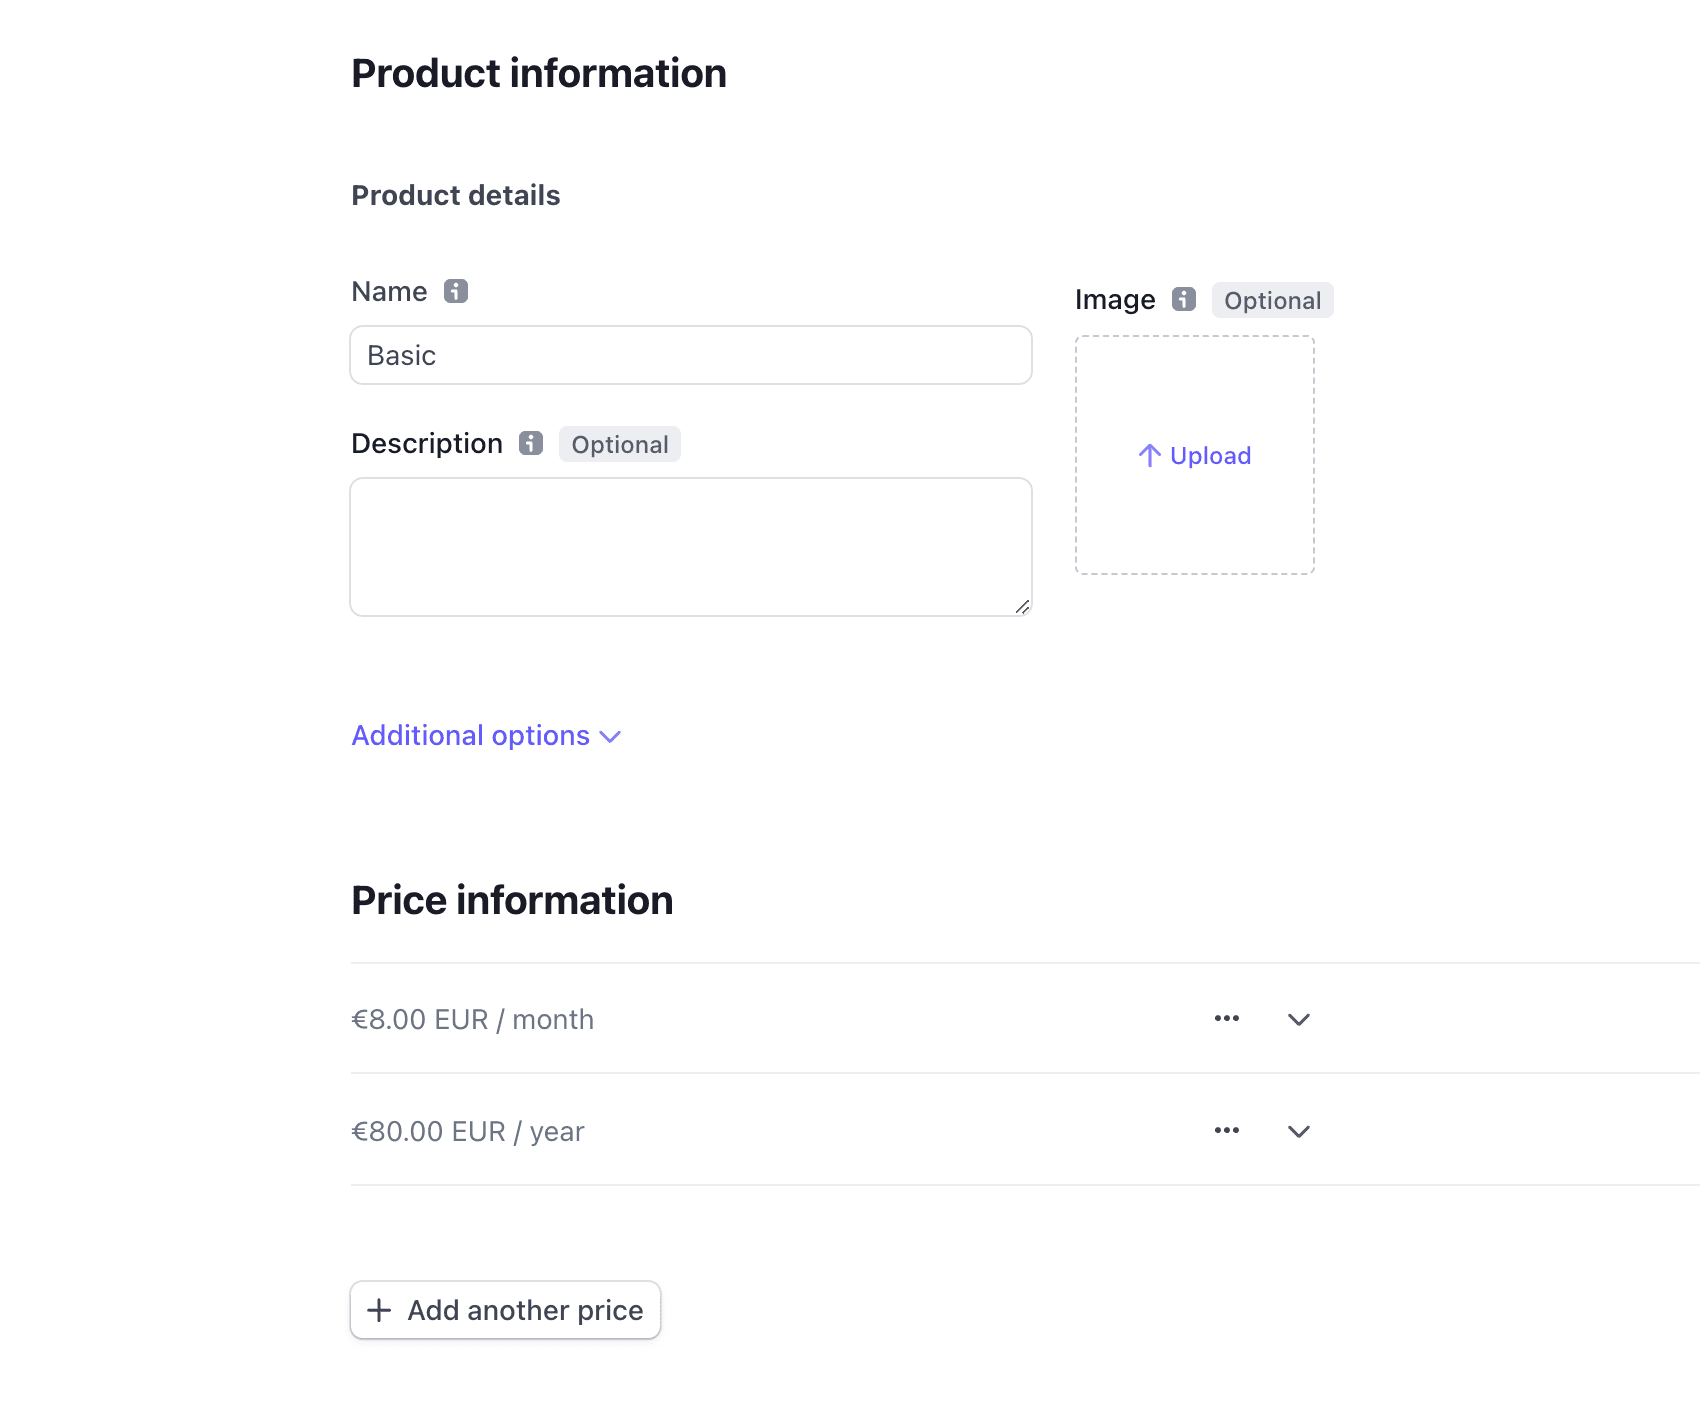
Next, let's create some subscription plans for your users. Head over to https://dashboard.stripe.com/test/products, click "Add product" and fill out the necessary information. Make sure to set the billing period to what you want. In this tutorial, I'm going to set it as monthly. If you want to offer a different payment period such as 'yearly' or 'weekly' subscription, click on "Add another price" and select the period you want. For example, the image below shows how I've set up a 'Basic' tier for my tiered plan system. It's available in monthly and yearly payments.
After creating your products, you need to obtain the pricing ID of the plan that you want your users to start their trial on. You can then add it to your credentials file. In this tutorial, we will set the basic plan as the default one that all users start on during their trial period.
# credentials.yml
stripe:
  secret_key: YOUR_SECRET_KEY
  pricing:
    basic:
      monthly: YOUR_PRICE_ID
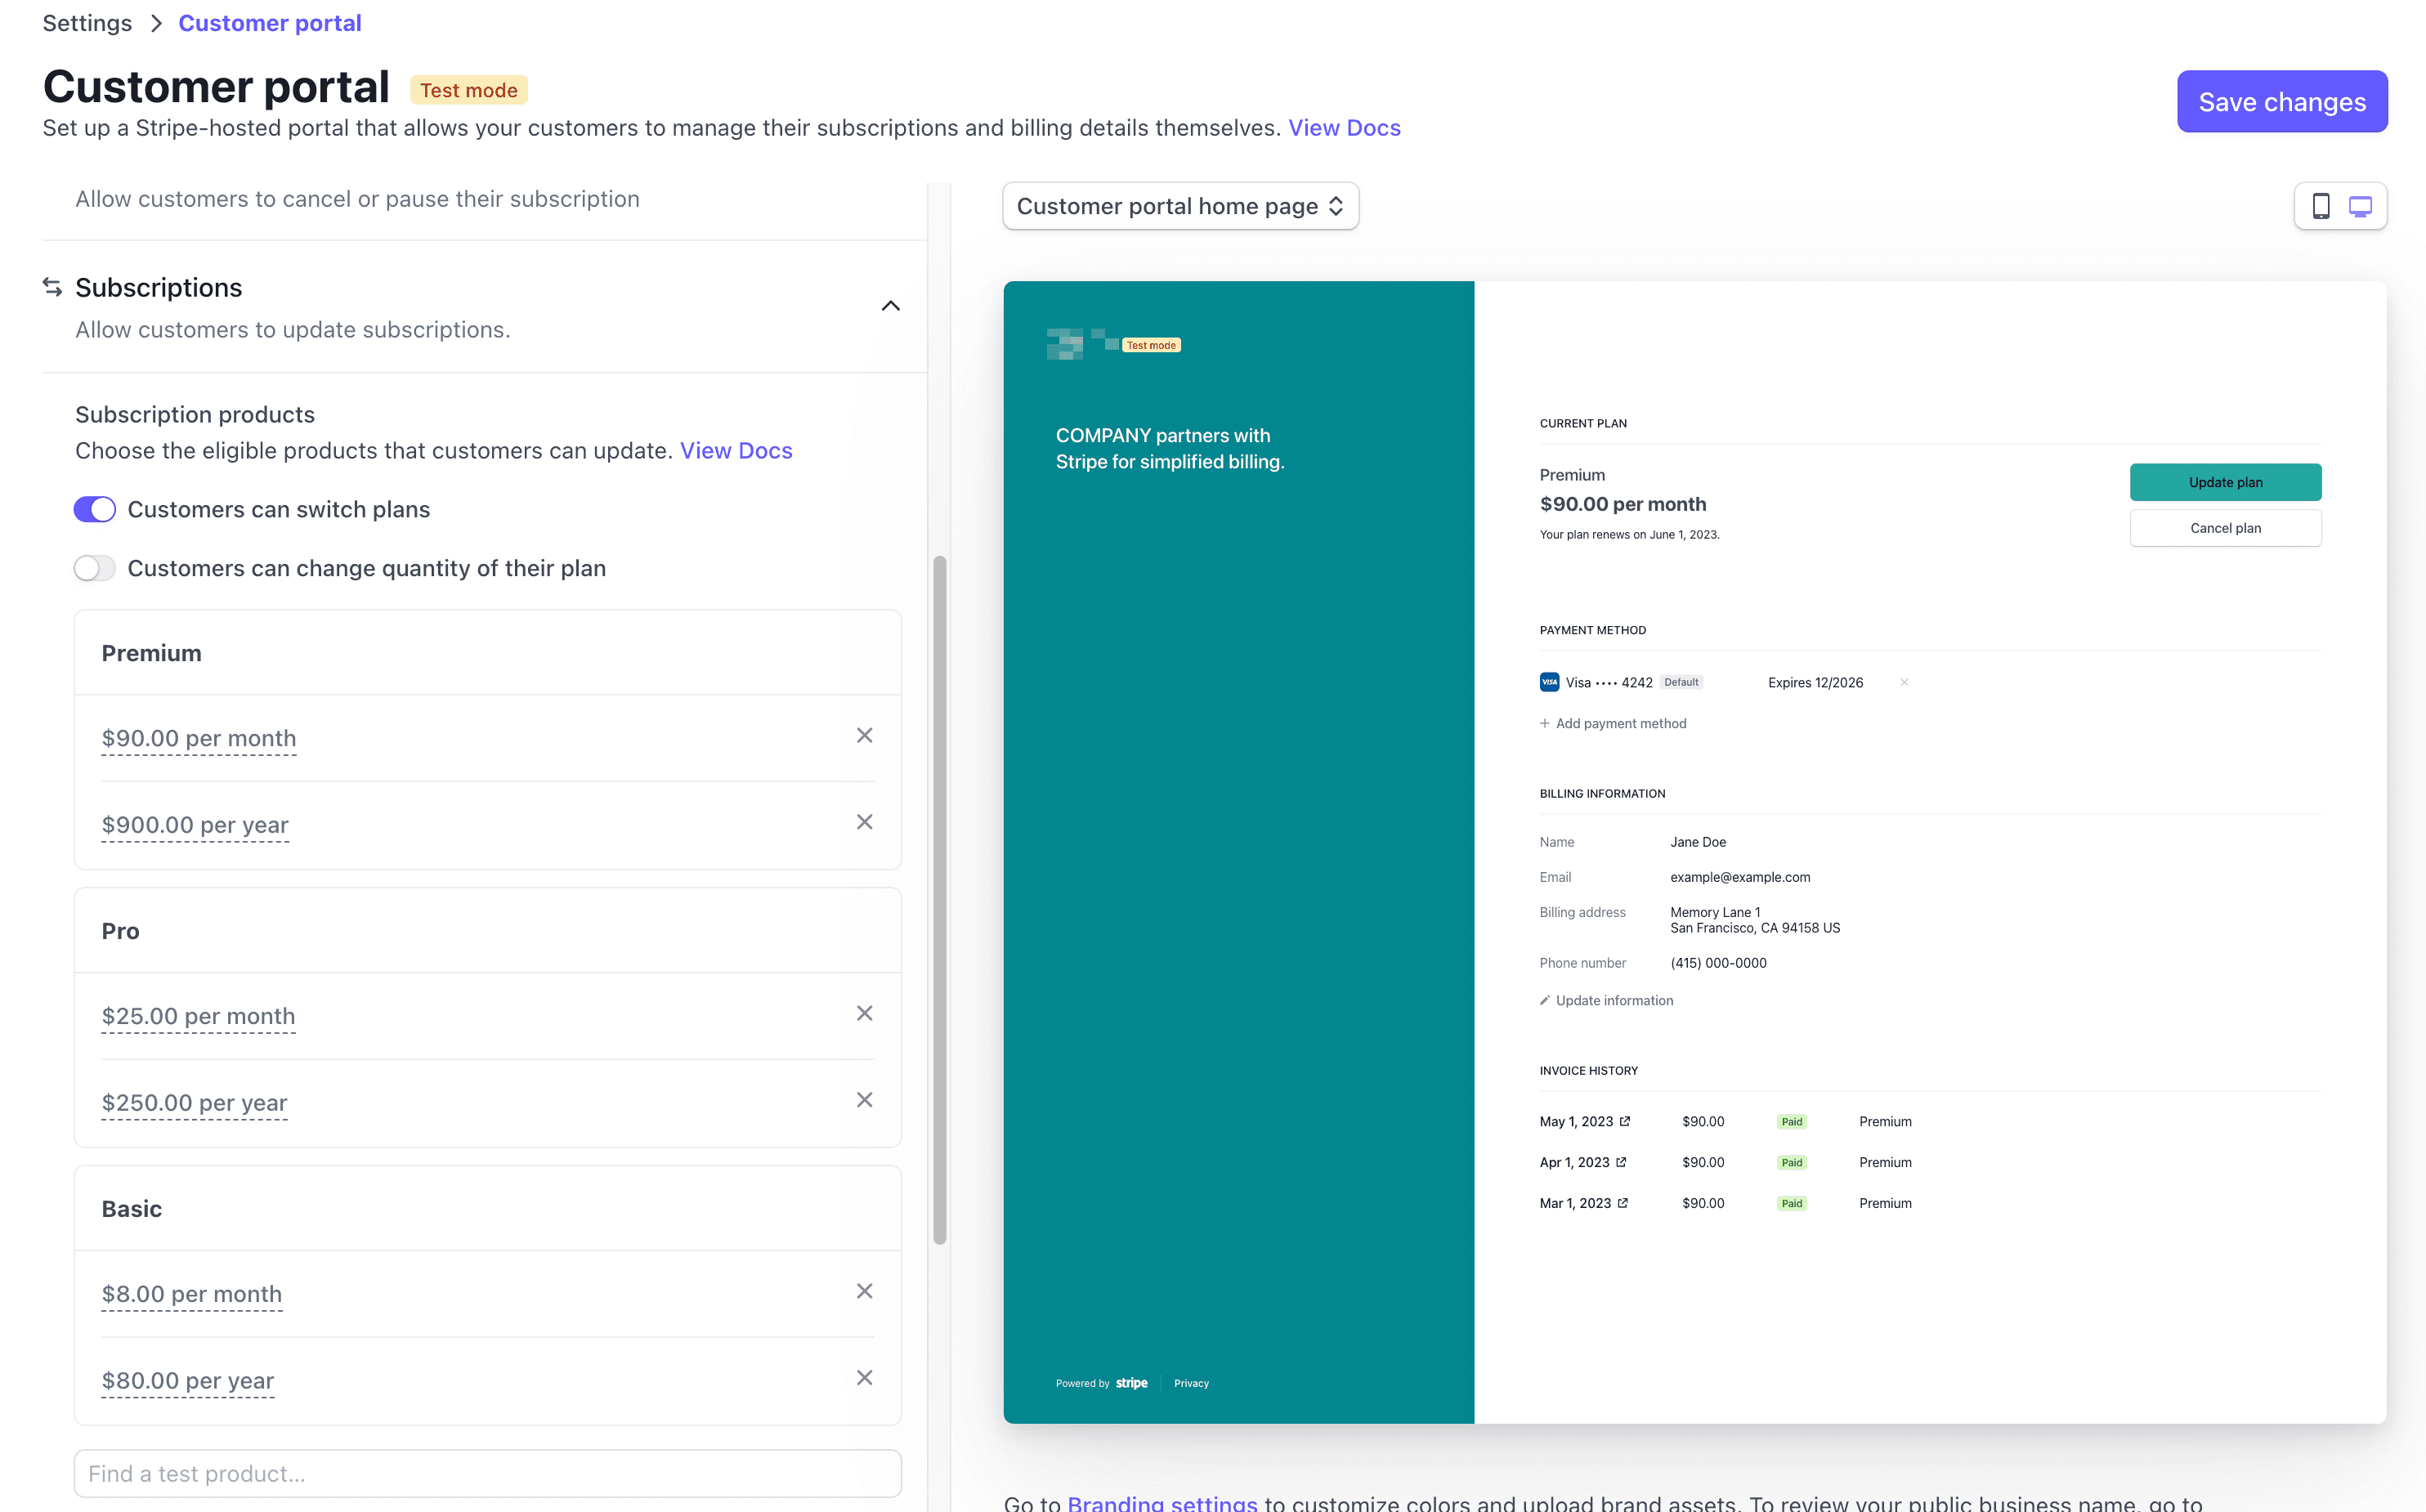
Finally, let's see the magic of the Stripe customer portal. Head over to https://dashboard.stripe.com/test/settings/billing/portal and get creative with your customizations. Don't forget to include the subscription options that you want to offer your users under the 'Subscriptions' dropdown. Check out the screenshot below to see how I've set up a tiered system.
With the basic plan pricing added to the credentials file, you can now use it in your user.rb model to subscribe a user to the basic plan. Add this to user.rb
# app/models/user.rb
enum plan: {
  basic_monthly: 0,
  basic_yearly: 1
}

before_validation :create_customer_on_stripe, on: :create

private

def create_customer_on_stripe
  params = { email: }
  response = Stripe::Customer.create(params)
  self.stripe_customer_id = response.id

  # Creating a free trial subscription. A subscription like this needs to be created to allow
  # customers to choose other subscriptions or cancel on the customer portal.
  subscription = Stripe::Subscription.create({
    customer: response.id,
    items: [
      { price: Rails.application.credentials.dig(:stripe, :pricing, :basic, :monthly) }
    ],
    trial_settings: { end_behavior: { missing_payment_method: 'cancel' } },
    trial_period_days: 7
  })
  self.subscription_status = subscription.status
  self.plan = subscription.items.data[0].price.lookup_key
end
If you created a user in your app earlier, you might have to run rails db:migrate:reset to clear the database. This time when you create a user, a Stripe customer ID will be created for the user also.
Next, we add a route to our Rails application for the customer portal sessions controller. This will allow us to create a link to the customer portal. Just add this line to the routes.rb file:
# config/routes.rb
resources :customer_portal_sessions, only: [:create]
Now let's create a new controller file called customer_portal_sessions_controller.rb with the following command:
> rails generate controller customer_portal_sessions create
The create action will use the Stripe API to create a session for the customer portal. The session requires the customer's Stripe customer ID and a return URL. Once we have that, we'll redirect the user to the session's URL. Add this to your create action:
# app/controllers/customer_portal_sessions_controller.rb
def create
  session = Stripe::BillingPortal::Session.create({
    customer: current_user.stripe_customer_id,
    return_url: "http://localhost:3000/"
  })

  redirect_to session.url, allow_other_host: true
end
Scaffold generation
Let's start by creating a scaffold that will serve as the root path for our app. Here's the command:
> rails g scaffold post title:string body:text
> rails db:migrate
Now, we create a new controller file called home_controller.rb in app/controllers. This will allow us to set the root path to the home index instead of the default root path. Copy and paste the following code:
# app/controllers/home_controller.rb
class HomeController < ApplicationController
  skip_before_action :authenticate_user!

  def index
    redirect_to user_signed_in? ? posts_path : new_user_session_path
  end
end
In routes.rb: set the root path to home index:
root "home#index"
Now that we've set up our root path, we can add a link to the customer portal in our app. I'm just adding it to the application.html.erb file for demo purposes but you can add it where you think best.
# app/views/layouts/application.html.erb
<body>
  <% if user_signed_in? %>
    <%= button_to "Manage billing", customer_portal_sessions_path, method: :post, form: { "data-turbo": false } %>
  <% end %>
  <%= yield %>
</body>
And that's it! You can now access the customer portal from your app. Add a payment method with a test card, update your subscription plan, and see the changes on the portal! But there's a problem. These changes won't show in your database. Thankfully we can use webhooks to do just this... and more if you're looking 👀
Webhooks
Webhooks are a powerful tool that allow your application to stay in sync with Stripe events in real-time. To implement webhooks, we will be using the stripe_event gem. Install with Gemfile and mount the Stripe Webhook engine like this:
# Gemfile
gem 'stripe_event'

# config/routes.rb
mount StripeEvent::Engine, at: '/stripe/webhooks'
Okay it's time to listen to webhooks from Stripe. For this, we need a pair of headphones 🎧. Just kidding. Run the following command in a separate terminal window:
> stripe listen --forward-to localhost:3000/stripe/webhooks

Copy the signing secret that comes in the terminal when you run this command and put it in your credentials file and initialise Stripe with it.
# credentials.yml
stripe:
  signing_secret: YOUR_SIGNING_SECRET

# config/initializers/stripe.rb
StripeEvent.signing_secret = Rails.application.credentials.stripe[:signing_secret]
Now that you've configured your application to listen for Stripe events, you can use these events to trigger actions in your application. For example, when a user updates their subscription in the Stripe customer portal, you can use the customer.subscription.updated event to update the user's subscription status in your application's database. This ensures that your application remains up-to-date with the user's subscription status and allows you to provide or restrict access to certain features accordingly.
Another example of using Stripe events is when a user pays for a product. By subscribing to the invoice.payment_succeeded event, you can take action in your application, such as sending a confirmation email or updating the user's order status. Let's listen for the customer.subscription.updated event in stripe.rb as follows:
# config/initializers/stripe.rb
StripeEvent.configure do |events|
  events.subscribe 'customer.subscription.updated', Stripe::EventHandler.new
end
If you want to add another webhook such as when a user pays for a product, add this to your code:
# config/initializers/stripe.rb
StripeEvent.configure do |events|
  events.subscribe 'customer.subscription.updated', Stripe::EventHandler.new
  events.subscribe 'invoice.payment_succeeded', Stripe::EventHandler.new
end
Stripe provides a comprehensive list of webhook events in their API documentation, and you can use these events to implement different use cases in your application.
In the code provided, we have subscribed to two webhook events, customer.subscription.updated and invoice.payment_succeeded. These events will trigger the Stripe::EventHandler class, allowing you to handle the events and make any necessary updates to your application. To use the Stripe::EventHandler class, make sure to require it at the top of your config/initializers/stripe.rb file.
# config/initializers/stripe.rb
require Rails.root.join('app', 'services', 'stripe', 'event_handler')
Create a new file called event_handler.rb in app/services/stripe. If this directory doesn’t exist already, you can just create it.
# app/services/stripe/event_handler.rb
module Stripe
  class EventHandler
    def call(event)
      method = 'handle_' + event.type.tr('.', '_')
      send method, event
    rescue JSON::ParserError => e
      render json: { status: 400, error: 'Invalid payload' }
      # Raven.capture_exception(e)
    rescue Stripe::SignatureVerificationError => e
      render json: { status: 400, error: 'Invalid signature' }
      # Raven.capture_exception(e)
    end

    def handle_customer_subscription_updated(event)
      subscription = event.data.object
      @user = User.find_by(stripe_customer_id: subscription.customer)
      @user.update(
        subscription_status: subscription.status,
        plan: subscription.items.data[0].price.lookup_key
      )
    end
  end
end
Note: Uncomment Raven lines if you have Raven for error tracking.
Remember, if you call EventHandler for a different event, you'll need to create a new method for it here. The name of the method must start with handle_ followed by the name of the webhook, with all . replaced with _. Makes sense right? Here's an example for help.
# config/initializers/stripe.rb
StripeEvent.configure do |events|
  events.subscribe 'invoice.payment_succeeded', Stripe::EventHandler.new
end

# app/services/stripe/event_handler.rb
module Stripe
  class EventHandler
    ...

    def handle_invoice_payment_succeeded(event)
      # Block here
    end
  end
end
Make sure that you're listening to Stripe webhooks in a seperate terminal. Now when you go to the Customer Portal and update subscription, the change will be in reflected in your database. And just like that you've integrated Stripe customer portal into a Rails app!
Be proud! 😎